It’s J here! I’ve decided to write this entry for the benefit of those starters in the world of BDSM. And oh, please don’t tell me you are a sub or a dom because of how 50 Shades of Grey influenced you. If you have to pick a side, make sure you give both roles a try before making a choice. I will start with the list of items, then the steps in making and improving the straps.
The placing of every piece of item for the restraint has been carefully planned and designed. The idea of a restraint is to restrict. Along with that, I had decided to put the buckles far away from where the hands can reach. The strap adjusters CANNOT be undone with just shaking or struggling. There is NO emergency release. Please use it wisely and smartly.
List of Items required
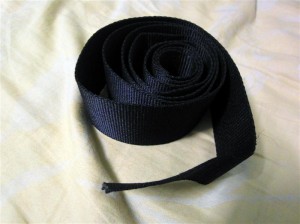
X metres of Straps
– The length will be approximately the width of your bed. Multiplied by two pairs of limbs. The width of the straps will decide the sizes of the items below. I had used 6 metres of Nylon (like seat belt material) for mine.
For queen/ king sized beds, please read all the way to part 5, ‘Upgrade’, section as you will NOT be following the width of your bed. Do note that the minimum total length (multiplied by 4 for the 4 limbs/corners) will be the distance from the floor to the height of the mattress, plus a generous extra length for adjustment freedom.
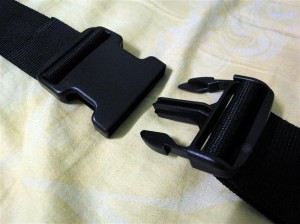
4 Quick-release Buckles
– Preferably bought at the same time to ensure compatibility.
4 Strap Adjusters
Step-by-Step Guide/ Instructions
1. Cutting
Cut the strap into 4 equal parts. This is the length of one strap. In my case (of a 6m length), each is approximately 150cm.
2. Strap Adjusters
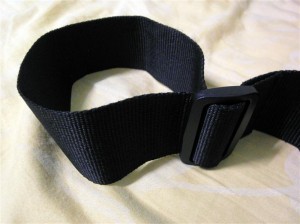
Insert the 4 strap adjuster to make a loop on all 4 straps. At a distance you think whoever or your own wrists, thighs, feet is comfortable with. Since it’s a strap adjuster, you can actually adjust the size of the loop after you’re done. Please note that it will take some time to figure out which direction the adjuster has to be installed. But you’ll handle it after a while.
3. Buckles
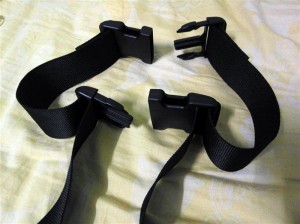
When you are done with the adjusters, take two of the straps, and face the untouched ends at each other. Insert the ‘fork’ and the ‘spoon’ into the ends. Like above, it will take some time to figure out how to install them. And most importantly, after you are done, join the two straps and tug at the loops real hard to ensure you’ve placed the buckles in the right direction. If the straps lengthen when you pull at the loop (which should not happen), redo the buckles, you might have inserted the straps wrongly.
4. End
At this junction, you should have completed the basic restraints. Use it over or under your bed, or around the bed frames. It should be strong and sturdy. If you’re using a nylon strap like shown in the photos, you can use a lighter to burn the edges to an ‘unhairy’ endings. Read on for an upgrade using the remaining two buckles.
5. Upgrades
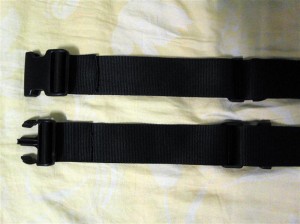
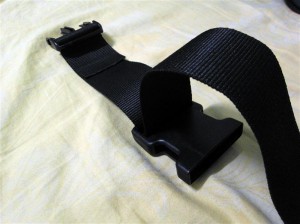
Now, you’re ready for a little upgrade. Follow the photo above and install the ONE set of buckles for these two straps. The photos below will help you visualise better what is at the middle of the straps.
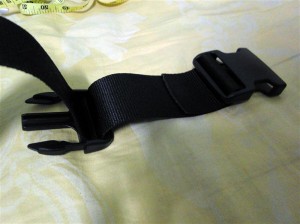
Above, you can see the ‘fork’ side, and the ‘spoon’ side. Note that it will look weird after you’re done. But try your best to angle it as shown in the pictures to know you have got it right. It will take more time to do this part.
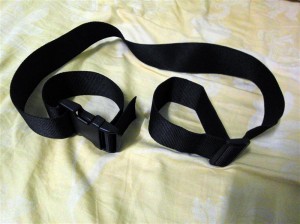
The above is another picture to show you how a single strap will look like. The loop on the left is created by closing the buckles. The loop on the right is for the wrist. In case your bed is a king or queen sized, the width is too big to be covered with a single strap. So, this upgrade will allow the end, with the buckle, to reach around the legs of the bed. Please do not use the end with the buckle for the handstrap as the sub/ victim roleplay, can actually reach and break free. Unless that’s your intention.
The above shows the ‘weird’ positioning of the secondary buckle (which is the lower one) and how it can be a instant shortener when you clip them together.
Up to this point, everything on the strap is adjustable. So, let your creative minds take over and find out how short or long it can go. The pain around the wrist is your partner’s cue not to struggle, and not letting him/ her go is YOUR sign that you are serious. The more the person struggles, the more hurt the straps will cause. Let the person know giving up and letting you do what you want, is the best option.
6. Knees
I am currently in the work to include a simple PVC pipe that will force the knees apart using the constraints that we just made up there. I’ve been cracking my head and if anyone has any good ideas, please feel free to let me know and I can give it a try.

2 replies on “DIY: BDSM Restraints (Outdated!)”
On your point 6… Its known as a spreader bar.. Pvc pipe is not recommended.. Use a pole made of wood.. And use eye hooks for the ends
Oh yes. Spreader bar. I just can’t think of that word. Thanks. Eye hooks is a good way to hold the straps in place. I will look into it.