
Ok, I know this looks like one of those ‘cheesy’, ‘fantastical’ ads, but it really is not. There is one, simple configuration I’d like to share with you guys, if you haven’t already know about it.
DNS
‘DNS’ stands for Domain Name Sys.. yada yada.. whatever. Let’s get started to unlock (aka unblock) your browsers’ potential to surf the web unrestricted – without any speed loss! Do note that this is not a VPN service or any of those ‘lifehacks’ that hide your identity behind the internet. This is just a forwarding service that circumvents the bans/ filters that our big 4-5 internet service providers implement.
(I will be recommending a simplified Cloudflare 1.1.1.1. DNS configuration, so for those of you who already know of them, you can skip the rest of this post.)
That said, I urge you guys to continue practising safe web browsing habits, like not clicking on any suspicious links, or give out banking/ CC information to dubious merchants. There are legitimate reasons to why our ISPs have kept those websites blocked from us.
I will suggest making the following changes on the router-level, so everyone in your household can enjoy the benefits of your I.T. ‘skills’. Alternatively, you can manually configure individual devices so you/ they can still access those awesome sites when not at home.
Now, for the real jizz, there are 2 ways to use Cloudflare’s DNS, and 1 is as easy as installing an app called ‘1.1.1.1.: Faster & Safer Internet’ (check your appstore), and the 2nd method which is slightly complex, but highly recommended by me.
How to configure?
I will start by listing the step-by-step instructions for the few Internet-connected devices that I own. I will recommend doing a manual configuration, over using the app, as you can eliminate the need to download ‘one more app’, and save some battery from keeping the app running all the time.
Android
While I can provide some guidance for Samsung devices, if your phone does not use the same terms as my steps, you’ll have to refer to other online guides.
- Go to your ‘Settings’ app, tap on ‘Connections’, scroll down to the bottom, and tap on ‘More connection settings’.
- Tap on ‘Private DNS’, select ‘Private DNS provider hostname’ and type in the following text;
- 1dot1dot1dot1.cloudflare-dns.com
- Hit ‘save’, and go to a blocked/ banned site to see if it works.
iPhone, iOS
Sadly, I do not possess any products that run on Apple OSes, so you will have to refer to online guides for more information
Windows
- Go to ‘Control Panel’, or right-click on your Wireless/ LAN taskbar icon, and select ‘Open Network & Internet settings’.
- Click on ‘Change adapter options’, and right-click on either the Ethernet, or Wi-Fi icon, select ‘Properties’.
- Note that you will have to configure both adapters’ properties.
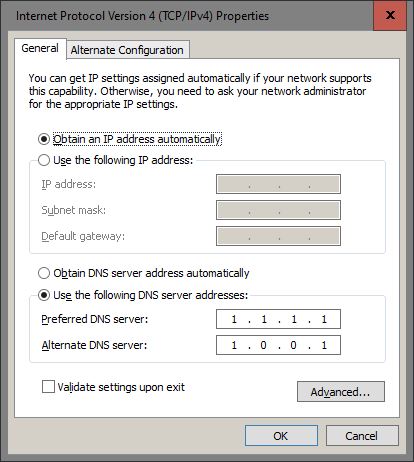
- Look for Internet Protocol Version 4 (TCP/IPv4), select it, and click on ‘Properties’.
- Enter the values as shown in Pic1;
- Click ‘Ok’ when done and close that window.
- Look for Internet Protocol Version 6 (TCP/IPv6), select it, and click on ‘Properties’.
- Enter the values as shown in Pic2, or copy+paste as follows; 2606:4700:4700::1111 and 2606:4700:4700::1001
- Click ‘Ok’ when done and close that window.
- That’s it! Visit some websites you know are blocked and you should be able to access them now.
Pic1 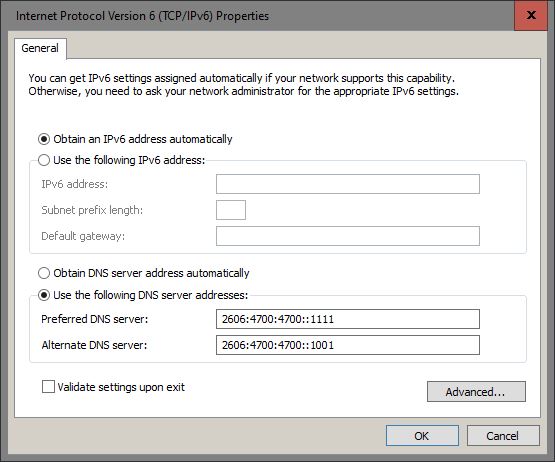
Pic2
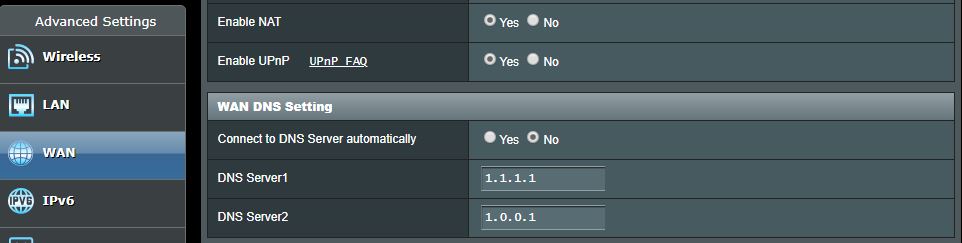
Routers/ Wireless Routers
For these devices, I will not be able to provide many useful guides as there are so many brands and types around, but the terms to look out for is the same – DNS. I use an ASUS branded (RT-AC1200G+) and the location to set the above DNS values are found under ‘WAN’, ‘WAN DNS Setting’.
I hope the above tips/ hacks/ tricks will serve you well, while you stay extra cautious when browsing any previously-banned sites, as our ISPs have legitimate reasons to keep them out of our reach.